9/28 Present at Alpha networks.
Reference Books:
Advanced Programming in the UNIX Environment 2nd.
(W. Richard Stevens & Stephen A. Rago)
2010/09/27
2010/09/06
Linux Man-Pages Release - 3.26
Linux Man-Pages 3.26 release.
Download from git :
Release Notes:
http://www.kernel.org/doc/man-pages/changelog.html#release_3.26
Download from git :
git clone git://git.kernel.org/pub/scm/docs/man-pages/man-pages.git
Downliad tarball
Release Notes:
http://www.kernel.org/doc/man-pages/changelog.html#release_3.26
2010/08/22
Vim plugin - Doxygen
# 1. DoxygenToolkit.vim
let g:doxygenToolkit_authorName="your name"
Usages:
:Dox
:DoxAuthor
:DoxBlock
:DoxUndoc(DEBUG)
:DoxLic
# 2. Doxygen.vim
cd ~/.vim/after/syntax;
ln -s doxygen.vim c.vim;
ln -s doxygen.vim cpp.vim;
ln -s doxygen.vim java.vim;
let g:doxygenToolkit_authorName="your name"
Usages:
:Dox
:DoxAuthor
:DoxBlock
:DoxUndoc(DEBUG)
:DoxLic
# 2. Doxygen.vim
cd ~/.vim/after/syntax;
ln -s doxygen.vim c.vim;
ln -s doxygen.vim cpp.vim;
ln -s doxygen.vim java.vim;
2010/08/10
vimgrep
:vimgrep /pattern/[g][j] file1 file2 ... fileN
vimgrep is using to search pattern from following filelist.
vimgrep accept to ignore case,
If want to using this feature, put /\c in the pattern to ignore case.
ex: vimgrep /pattern\c/ filename
or put /\C in the pattern to match it.
ex: vimgrep /PaTtErn\c/ filename
Without flag 'j', vim jumps to the first match.
With flag 'j', vim only quickfix list is updated.
You can using :clist to list all match location.
and using :cc N to jump to the match.
:cn can jump to the next match location.
:cN can jump back prior match.
more usage, please using :help vimgrep
2010/07/19
vim 一次註解多行
使用VIM時, 註解多行的方式如下:
1. 進入 command mode ,
2. 按ctrl-V, 然後圈選要註解的區塊
3. 按 I 進入 Insert mode
4. 鍵入註解符號或要輸入的內容
5. 按 ESC 兩次, 就可以看到輸入的註解已經套用在所選擇的那幾行
note: 步驟三的 I 可以替換成 A, 這樣就會變成在行尾註解
在C/C++ 註解多行其實可以透過下面的方式簡單完成,
但 VIM 的多行註解則適用於各式語言喔!
#if 0
... 要註解的部份
#endif
2010/03/29
Apple release Mac OS X 10.6.3 with QuickTime X, OpenGL improvements
昨天蘋果釋出 Mac OS 10.6.3 更新雪豹作業系統,
主要改進了QuickTime X 和 OpenGL-base應用程式定址相容性問題.
蘋果建議使用Snow Leopard 的使用者 update 到 10.6.3 版,
這次的更新共佔 437.2 MB的空間.
概略更新的項目如下:
- Improves the reliability and compatibility of QuickTime X
- Addresses compatibility issues with OpenGL-based applications
- Addresses an issue that causes background message colors to display incorrectly in Mail
- Resolves an issue that prevented files with the # or & characters in their names from opening in Rosetta applications
- Resolves an issue that prevented files from copying to Windows file servers
- Improves performance of Logic Pro 9 and Main Stage 2 when running in 64-bit mode
- Improves sleep and wake reliability when using Bonjour wake on demand
- Addresses a color issue in iMovie with HD content
- Improves printing reliability
- Resolves issues with recurring events in iCal when connected to an Exchange server
- Improves the reliability of 3rd party USB input devices
- Fix glowing, stuck, or dark pixels when viewing video from the iMac (Late 2009) built-in iSight camera
2010/03/26
Transport Stream Format.
簡介:
Transport Stream (傳輸串流) 簡稱 TS, 主要根據 ITU-T Rec. H.262 | ISO/IEC 13818-2 and ISO/IEC 13818-3制定而成.
Transport Stream 包含了一個或以上的 Program (節目),
Program 由 Video , Audio 和節目資訊(PSI) 組成,
而 Video 和 Audio 的 Elementary Stream 將被拆解裝載到 PES Packets.
而 PSI 則分為四種如下所列:
- Program Association Table
- Program Map Table
- Conditional Access Table
- Network Information Table
TS 結構分析 :
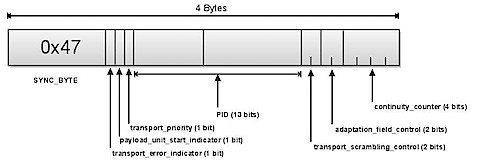
TS 的長度是固定的, 每個 TS Packet 都是 188 Bytes.
而前四個 Bytes 為同步字元(0x47),
之後則為 PID 等資訊,
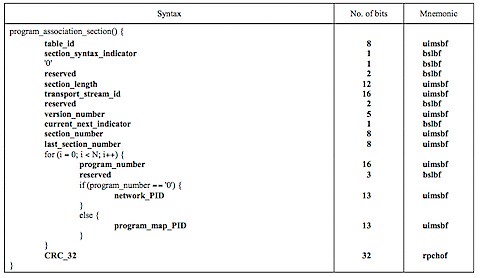
解碼時, Client 端裝置會先根據 PID 找到 PAT 表,
在透過 PAT 表內提供的 PMT 之 PID 來找到PMT 所在的位置,
最後再從 PMT 中找到相對應的資料串流, 開始解碼.
因此 , PAT 和 PMT 表是一定必須要提供的部份!
- table_id : 8 bit, PAT table ID 固定為 0x00
- section_syntax_indicator : 1 bit,
- '0' : 1 bit
- reserved : 2 bits
- section_length : 12 bits, ( 0xB000 | PAT HeaderLength )
- transport_stream_id : 16 bits
- reserved : 2 bits
- version_number : 5 bits
- current_next_indicator : 1 bit.
- section_number : 8 bits,
- last_section_number : 8 bits,
- program_number : 16 bits, 與 PMT 表中 program_number 對應
- reserved : 3 bits
- network_PID or program_map_PID : 當 program_number == 0 為 networks PID, 反之為 program PID.
- CRC_32
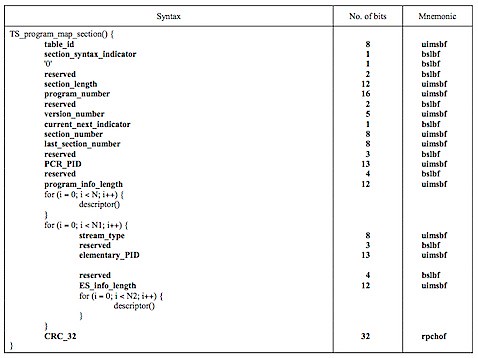
PMT 結構:
- table_id : 8 bit, PMT table ID 固定為 0x02
- section_syntax_indicator : 1 bit,
- '0' : 1 bit
- reserved : 2 bits
- section_length : 12 bits, ( 0xB000 | PMT HeaderLength )
- program_number : 16 bits, (和 PAT 表中的 Program_number 對應)
- reserved : 2 bits,
- version_number : 5 bitts,
- current_next_indicator : 1 bit.
- section_number : 8 bits,
- last_section_number : 8 bits,
- reserved : 3 bits,
- PCR_PID : 13 bits,
- reserved : 4 bits,
- program_info_length : 12 bits,
- stream_type : 8 bits, (MPEG4 : 0x10, H.264 : 0x1B , etc ...)
- reserved : 3 bits,
- elementary_PID : 13 bits,
- reserved : 4 bits
- ES_info_length : 12 bits,
- CRC32 : 32 bits
2010/03/25
Standard I/O Redirection
Linux 提供三種 I/O Streams 給程式使用
STDIN (0) : default is keyboard.
STDOUT (1) : default is terminal.
STDERR (2) : default is terminal.
而 STDOUT 和 STDERR 可以被重新導向至檔案 ( I/O Redirection ), 作法如下:
$ binary > (將 STDOUT 重新導向)
$ binary 2> (將 STDERR 重新導向)
$ binary &> (將所有輸出重新導向)
$ binary 2>&1 (將 STDERR 重新導向至 STDOUT)
$ binary >&2 (將STDOUT 重新導向至 STDERR)
使用 > 輸出導向的檔案預設會被完全覆蓋, 也可改用 >> 來添加在原檔案的結尾
而關閉 File Description 的方式則如下:
$ n<&- (關閉 Input File Description n)
$ 0<&- , $ <&- (關閉 STDIN)
$ m>&- (關閉 Output File Description m)
$ 1>&- , $ >&- (關閉 STDOUT)reference : http://tldp.org/LDP/abs/html/io-redirection.html
2010/03/14
Linux 底下處理減號開頭的檔案名稱
在 Linux 底下, 由於減號(-) 通常都被來利用為指令的 Option,
因此若我們執行檔案處理的指令時,
若遇到減號開頭的檔名 (Example : -filename)
則通常會無法順利執行,
例如:
$ rm -filename
$ mv -filename filename
$ cp -filename filename
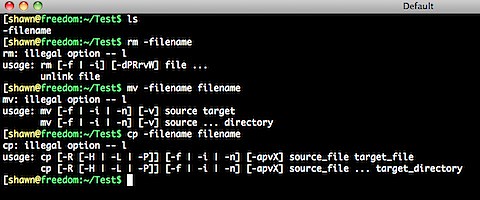
這幾個執行的結果都是失敗的!
遇到這種情況我們通常可以透過 ./ 或是 -- 來解決:
$ cp ./-filename filename
$ rm -- filename
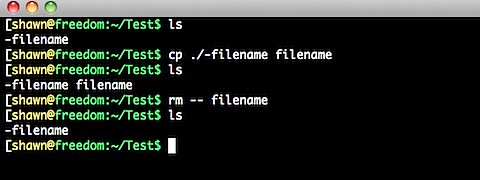
當然啦,在UNIX底下, 減號是非常常用的特殊符號, 極度不建議拿來命名檔案或資料夾,
但若真的遇到這種狀況的話, 就透過以上的方式來處理囉 :)
2010/03/09
X over ssh
一般我們遠端使用 Linux or Unix 主機時,
常用的方式有 VNC, 另一種就是透過 ssh 來啟動 X 圖形介面.
X 視窗系統(目前版本為 X11) 提供了圖形介面來代替文字操作介面, 多數 Unix-linx 的作業系統都有支援,
ssh 則是使用 Secure shell, 透過網路來做兩台主機間的溝通. 可以在加密的狀態下使兩台有ssh的裝置透過網路連接
如果我們透過 ssh 使用 X windows system,
就可以透過遠端連線來使用圖形話GUI介面,
要使用 X over ssh 要先準備幾個項目
1. 首先在本機端 (local) 安裝 X server
2. 遠端系統必須預先安裝 xterm, xeyes, xcalc, xlogo, xedit, xload, xclock, and twm, mwm, Gnome and/or KDE
3. 選擇性安裝 xsnow, rclock, rxvt, xpaint, xdaliclock, Blackbox, wmaker, and fvwm2
5. 遠端系統必須運行 sshd .
當準備好以上幾個項目後, 就可以透過簡單的指令來實作 X over ssh
只要在平常ssh 指令後加上 "-X" option, 就能讓 X windows 通過 ssh 來運行
例如:
ssh -X 192.168.0.100
若是遠端的主機使用標準外的ssh port (default port 22),
則可以加上 "-p" 來指定使用的 port.
ssh -X -p 8080 192.168.0.100
當login近遠端的主機後, 及可以透過 command line 帶起圖形介面的APP.

這邊的例子是透過 X 啟動遠端主機的 Wireshark,

要注意的是, 雖然 wireshark 是開在 local 的畫面,
但實際上透過網路鯊魚擷取到的封包是遠端主機網路介面抓到的喔!
另外也可以在透過ssh -X 連線到遠端主機後,
執行遠端的 gnome 介面或是 kde 介面,
就可以以圖形介面來操作系統囉!
kde介面:
$ startkde
gnome 介面:
$ gnome-session

reference:
2010/03/04
Vim Session
Vim 7 除了相當好用的 Vim Tab Pages 功能外,
也能搭配 mksession 來儲存目前 Vim 的狀態,
例如,每次工作實都開了一些Vim Tab Pages,
或是設定了一些 .vimrc 中非預設的設定
但關掉 Terminal 後就通通消失,
Tab Page要重開, 設定也要重新設定過,
這時候就可以利用 mksession的功能囉!

:mksession 預設會幫你在目前的目錄底下產生 Session.vim
裡面記錄了已經開啟的 Tab 資訊以及其他設定,
也可以用縮寫 :mks
下次開始 Vim 時, 只要加上 -S Session.vim,
或是開啟 Vim 後使用 :source Session.vim,

就能恢復上次工作的狀態了:)

當然,也可以自己決定Session檔的名稱,
只要在 mksession 時指定檔案名稱即可
:mksession filename
要注意的是如果Session file 已經存在,
則必須要加上 ! 來覆蓋已存在的檔案.
:mksession! filename
搭配Tab Pages 真的是蠻方便的功能唷^^b
2010/02/07
Vim Tab Page 功能
Vim Tab功能:
:tae[dit] or tabnew + filename 開新 tab page
:tabc
:tabc[lose] {count}
:tabo[nly]
:tabn[ext] 下一個tab
:tabp[revious] 上一個tab
:tabm[move] [N] 移動目前的Tab Page順序到第N頁, 若N為0則移動到第一頁.
:tabfind filename* 尋找當前目錄檔案filename開頭的檔名
:tabs 列出以開啟的tab
:tabdo %s/foo/boo/g 將開啟的tab中所有foo替換成boo
Note that : Tab Page 是 Vim 7 開始加入的新功能
--
2010/02/01
Vim 分割視窗功能
分割視窗功能:
:sp filename 橫切視窗 (也可用Ctrl-W + S)


:vsp filename 直切視窗 (也可以用Ctrl-W + V)

當然也可以合併使用啦!

視窗放大縮小:
Ctrl-w +(放大)
Ctrl-w -(縮小)
Ctrl-w _(放到最大)
Ctrl-w =(回復各一半)
:vsp 視窗放大縮小可用
Ctrl-w |(放到最大)
Ctrl-w =(回復各一半)
:set mouse=a 啟動滑鼠功能
詳細滑鼠設定即使用方式可以參考 Vim help file 中的 mouse-using
啟用滑鼠功能後,就能更輕易的用滑鼠拖拉視窗大小囉:)

2010/01/28
[Driver] 新手上路
module_init 和 module_exit 是特殊的核心巨集,
前者會在模組被載入核心時執行.
後者會在模組被卸載時執行.
Module 初始函式範例:
static int __init init_function_name(void)
{
//...}
module_init(init_function_name);
__init 和 __initdev 告知 kernel 函式只用於初始期間,
在 Module 被順利載入後, 模組裝載器會丟棄初始函式,
釋放記憶體作為其他用途.
--
Kernel API 經常看到名稱開頭為雙底線 (__) 的函式,
以這種方式標記的函式,表示他們是相當低階的元件, 請小心使用.
("If you call this function, be sure you know what you are doing.")
--
modprobe 和 insmod 同樣可用來載入模組,
差別在於 modprode 會先檢查目標模組的懸置符號表,
若還有 kernel 符號表沒有的項目, 會在當時的模組搜尋路徑找尋,
若有找到則一併載入. insmod 則不會自動滿足模組相依關係.
通常直接出現 "unresolved symbols"
--
lsmod 是讀出 /proc/module 虛擬檔, 並以 Human Readable 呈現.
2010/01/25
[ssh notes]ssh config
在~/.ssh/config
可設定預設ssh連到主機的 Account 和 port.
example:
Host 名稱
HostName DomainName
User 預設登入帳號
Port port number
2010/01/19
開發 UPnP 時好用的小工具
1. miniupnpc
http://miniupnp.free.fr/
2. Intel(R) tools for UPnP(TM) Technology
http://software.intel.com/en-us/articles/intel-software-for-upnp-technology-technology-overview/
miniupnpc 是一個相當好用的 UPnP IGD Client
還是 Open Source, 透過 miniupnpc 可以簡單的控制 UPnP IGD Device
也有以編譯好的 windows dos executable 可直接使用
Intel(R) tools for UPnP(TM) Technology 則是很好用的輔助工具
常用的有Device Spy, Device Sniffer 等等,還有許多沒下去研究
今天用Device Sniffer 發現有簡單的介面可以輕易的對 UPnP Device 下 Request
除了基本的 HTTP/1.0 GET, HTTP/1.0 HEAD 外
也可客製化自己的 Request 然後對 UPnP Device 發送
就不用在辛苦的用 Wireshark 偷看 UPnP Client 和 Device 之間的對談囉XD
off_t 是32bit 還是64bit呢?
檔案位置的最大值受限於 off_t 資料型別本身的大小.
多數機器架構會定義為C的long 資料型別
若有需要將 off_t 由 32 bits 轉成 64bits
只要在 CPPFLAG 中加入 D_FILE_OFFSET_BITS=64 即可
ex:
CPPFLAG += -D_FILE_OFFSET_BITS=64
2010/01/14
[Programming] Difference of Struct Define between C and C++
今天和 Evan 一起找 Bug 時發現了一個被我忽略的 C/C++ 小細節,
在 C++ 中, 當宣告了一個 struct 後,
可以直接用這個結構來做為型態名稱,
例如:
struct sample_struct
{
char buffer[10];
int i, j, k;};
在 C++ 裡, 可以直接使用
sample_struct test;
而在 C 語言中較為嚴謹, 需要在每個變數宣告之前加入關鍵字 struct :
struct sample_struct test;
若直接在 C 裡用 sample_struct test; 編譯時會看見 ERROR 唷!
2010/01/11
[vim skills] makeprg and errorformat
makeprg 與 errformat 讓 vim 結合了編譯器的功能
而 errorformat 則記錄了編譯過程中的錯誤與警告,
讓我們可一邊撰寫程式碼, 一邊除錯
而 makeprg 選項的功能是定義編譯時執行的指令,
當我們在 vim 的command mode 輸入 :make 時,
makeprg 所代表的指令就會被執行, 預設為 make.


我們也可以將makeprg設定為其他的指令, 例如:

那我們在執行 :make 時, 就會執行 make clean啦!
(當然應該不會有人把make設定為make clean吧...)
而如果邊一時發生錯誤呢?
以下是一個錯誤示範:

當我們在 command line 敲下 :make後, 一堆錯誤就跑出來啦!

這邊我們可以用 :cl 來列出所有的錯誤訊息

第一個數字就是錯誤代號,可以用在 :cc 指令
:cc 會跳到最近一個錯誤發生的地方(沒用過當然就是跳到最開始的錯誤囉...)
而 :cc4 就會跳到錯誤代號4的程式碼的位置,

很方便吧:)
其他常用來觀察錯誤的指令如下
:cl 列出所有錯誤
:cn 跳到下一個錯誤
:cp 跳到上一個錯誤
:cc 跳到最近觀察過的錯誤,若cc後帶有數字,則跳到該錯誤
:cr 跳回第一個錯誤
:cla 跳到最後的錯誤
其他更詳細的設定與說明, 可以參考 vim的 help file 中的quickfix部分.
參考資料:
Anthony的<<用vim寫程式快n倍>>
訂閱:
文章 (Atom)